Read this guide on How to hack your IKEA PAX wardrobe doors for a custom look. Learn how to turn your basic PAX unit into a custom built-in!

If you have been following us you know we love an IKEA hack. We previously upgraded our boring IKEA PAX wardrobes in our old house to look like a custom built-in closet. You can check out our IKEA PAX Hack: How to Turn Pax Wardrobes into Built-Ins blog post or Small Closet Makeover | How To Make a PAX Wardrobe Look Built In YouTube video in the above links.
But if you want to see us customize plain doors of a PAX wardrobe into custom designer built-in looking door fronts than check out our How to hack your IKEA PAX wardrobe doors for a custom look step-by-step tutorial.
Introduction:
IKEA has revolutionized the world of home organization with their modular furniture systems, and one of their most popular products is the PAX wardrobe system. Whether you’re creating a simple closet or a full walk-in wardrobe, the IKEA PAX wardrobe units are incredibly versatile, offering a variety of sizes, finishes, and configurations to suit your needs. However, while these wardrobe systems are fantastic in terms of storage, the plain doors that come with them often leave something to be desired in terms of style and customization.
This is where IKEA PAX wardrobe hacks come in. With a little creativity and some basic tools, you can take your PAX wardrobe from basic to bespoke. By hacking the doors of your PAX wardrobe, you can create a piece of furniture that feels custom-designed, adding a personal touch to your bedroom or closet space. Whether you want a sleek, modern design, a rustic farmhouse feel, or something totally unique, there’s an IKEA hack that will work for you.
In this guide, we’ll walk you through the entire process of hacking your IKEA PAX wardrobe doors. From adding crown molding and trim pieces to creating inset doors, installing creative handles, and applying fun finishing touches, we’ll show you how to take your PAX wardrobe systems to the next level with easy-to-follow steps and expert tips. With just a little time and effort, you can create a wardrobe that feels luxurious, functional, and uniquely yours.
*This post may contain affiliate links. When you buy a product through one of our links, we get a commission at no cost to you! Thank you for supporting our blog so that we can continue to bring you posts like these. This post was sponsored by Wagner. All opinions are our own.*
Why Hack Your IKEA PAX Wardrobe?
The beauty of the IKEA PAX closet system lies in its flexibility. The PAX units are designed to work together, and with their range of sizes and adjustable components, they can be adapted to fit nearly any space. You can create a completely customized closet layout, from shelving and hanging rods to Komplement drawers and other interior accessories. The problem, however, is that the basic doors that come with the system don’t always match the aesthetic vision you have for your space.
That’s where IKEA hacks come in. By customizing the doors and adding trim, handles, and other design elements, you can completely transform the look of your wardrobe and give it a built-in closet feel, even if you’re using a pre-made IKEA wardrobe frame.
Additionally, a wardrobe hack can help you save money. Custom cabinetry can cost thousands of dollars, but by modifying your IKEA PAX unit doors, you can get a perfect match for your personal style at a fraction of the cost. The process is also much simpler and more accessible than you might think, even if you don’t have advanced carpentry skills.
Materials You’ll Need
To get started on your IKEA PAX wardrobe hack, you’ll need a few materials and tools. Depending on the design direction you choose, you might need some specialized items, but for the most part, you can get by with common materials that are easy to find. Below is a list of everything you’ll need:
Basic Materials:
IKEA Products:
- IKEA PAX wardrobe frames: Choose the PAX units that fit your space. This could be a combination of narrow, tall units for a walk-in closet, or shorter, wider units for a more compact room. The pax frames will serve as the backbone of your wardrobe system.
- IKEA PAX doors: These are the plain, basic doors that come with the PAX wardrobe system. These will be the focus of your customization. Depending on the look you’re going for, you’ll either leave them as is or hack them into something unique. We started we IKEA’s FORSAND Door in white.
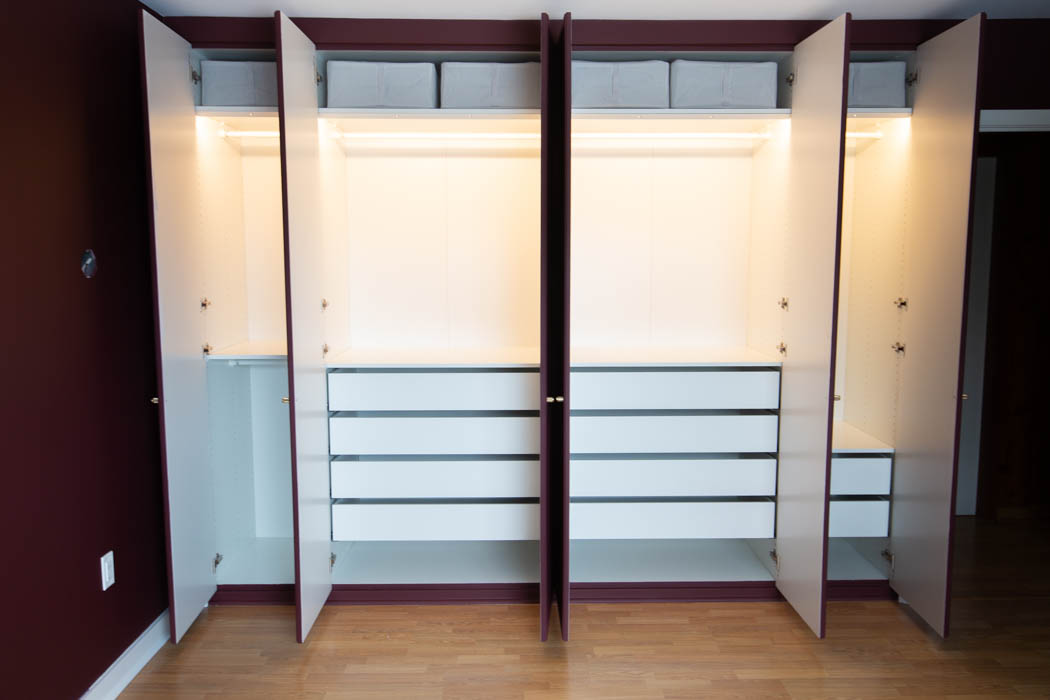
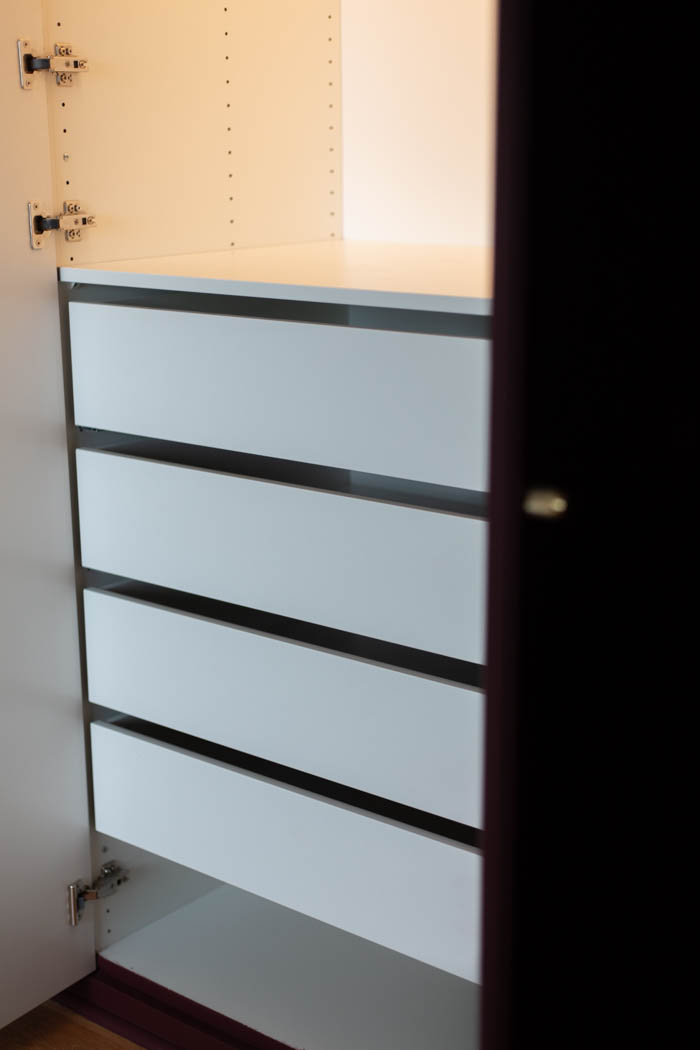
- Komplement drawers: If you want to add more storage space or improve the functionality of your wardrobe, consider adding Komplement drawers. These can be customized in various ways to suit your needs.
Other:
- Trim pieces and crown molding: These materials will give your wardrobe a high-end, built-in look that mimics custom cabinetry. Look for pre primed wood or other wood trim for a sleek, clean finish. We found 1/4″ thick MDF worked great tor trim our and customize the door faces
- Wood filler: Used to fill in nail holes and any gaps that may appear when attaching trim or other pieces to the doors.
- Miscellaneous hardware: You’ll need a nail gun or finish nails for attaching trim, cabinet screws may be necessary for attaching hardware or additional support pieces.
- Creative handles: Swap out the standard handles with something more eye-catching. Brass handles, sleek modern knobs, or colorful pulls can transform your wardrobe. We used CB2’s Nicolo Knurled Unlacquered Brass Knobs.
- Paint or paintable wallpaper: You can either paint the doors in a color that suits your style or use paintable wallpaper for added texture. This could be a great option if you want to add a pattern or unique finish to the doors.
- Scrap piece of wood: This can be used to create a frame for mirror inserts, to fill in any gaps, or as a backer piece for added stability and design.
- Mirror inserts or small cutout mirrors: Mirrors can add a chic and functional element to your wardrobe, making it both visually interesting and practical.
Essential Tools:
- Laser level: For ensuring that your trim, molding, and doors are perfectly aligned and straight.
- Nail gun: A finish nail gun or pin nailer is ideal for quickly securing trim pieces and molding without leaving visible nail holes.
- Table Saw: For cutting pieces to size
- Mitre saw: for cutting trim to length
- Router Table and Router Lift: for creating custom finishes and details on trim work
- Router Bits: To add details to trim, we used this bit to add the rounded detail to the bottom of the drawers.
- Drill: For creating holes for handles and other hardware.
- Power sander or sandpaper: For smoothing out surfaces and prepping your wardrobe for paint or stain.
- Paint sprayer or paintbrush: A spray gun is great for applying a smooth coat of paint, but a brush will work if you’re working with smaller areas. We love our Control Pro 130 for painting rooms and our Flexio 3550 for smaller projects. We used the Wagner Flexio 3550 cordless sprayer for all the cabinet doors.
- Staple gun (optional): If you’re using fabric or wallpaper, a staple gun can help secure it to the doors.
How to hack your IKEA PAX wardrobe doors for a custom look
Step 1: Prep the Space
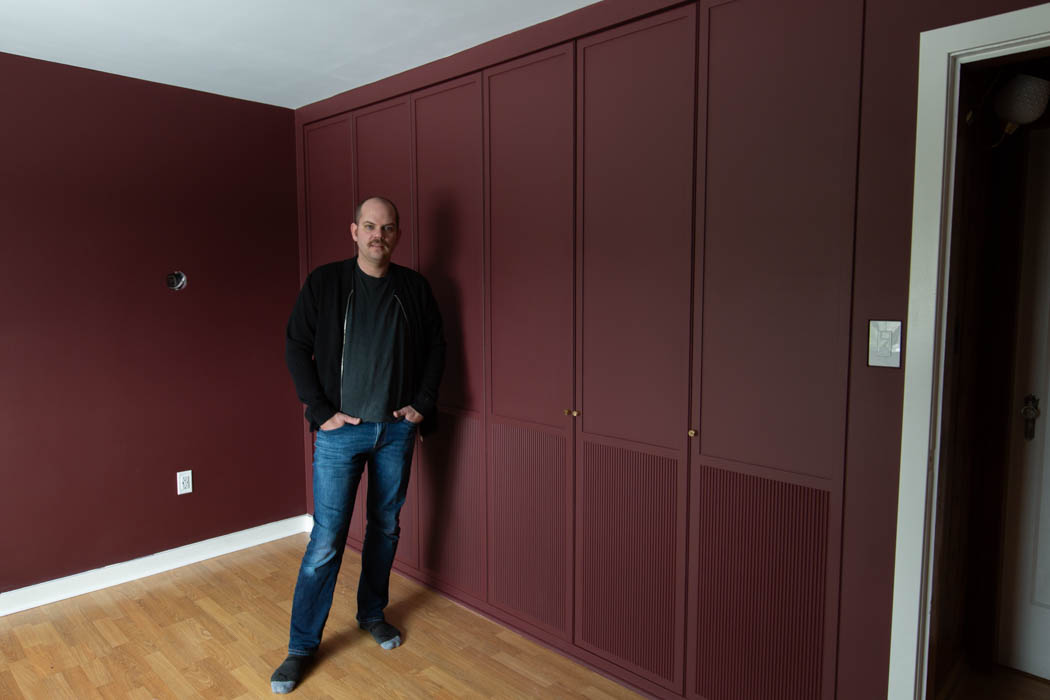
We wanted out PAX unit to look built in, so we actually re-configured our bedroom space and re-drywall the area to fit the pax units in. At the same time we decided to remove the popcorn ceiling and re-center the light.
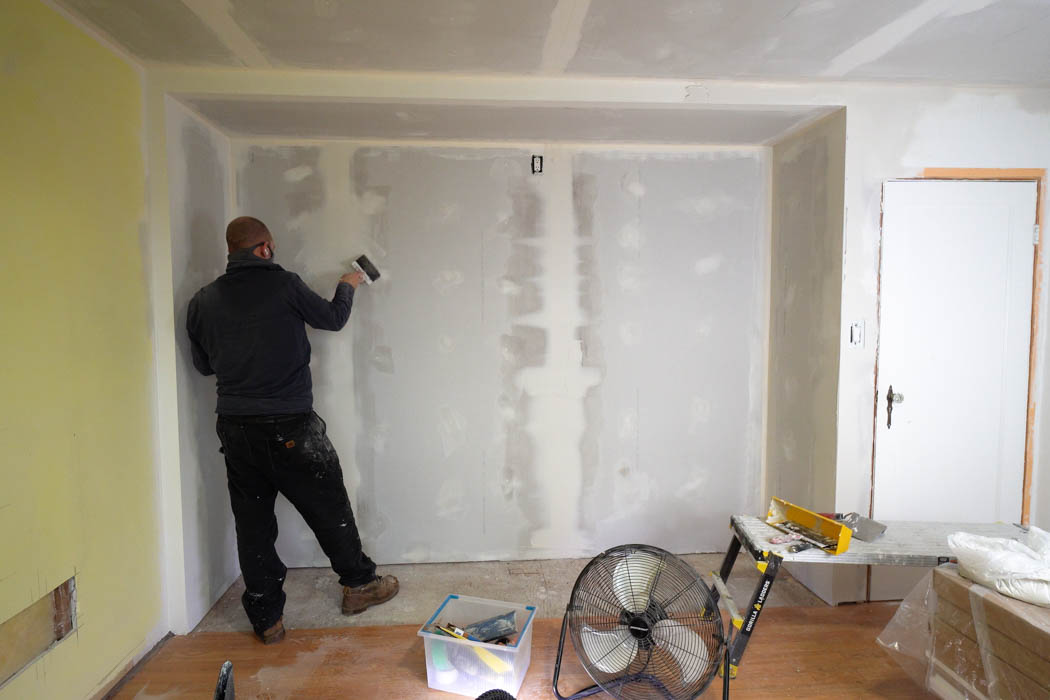

We ended up moving a wall 12″ so that we could have the doors/faces of the IKEA PAX cabinets sit flush with the wall. Moving the wall back also allowed for a king size bed and nigth stands to work in the space.
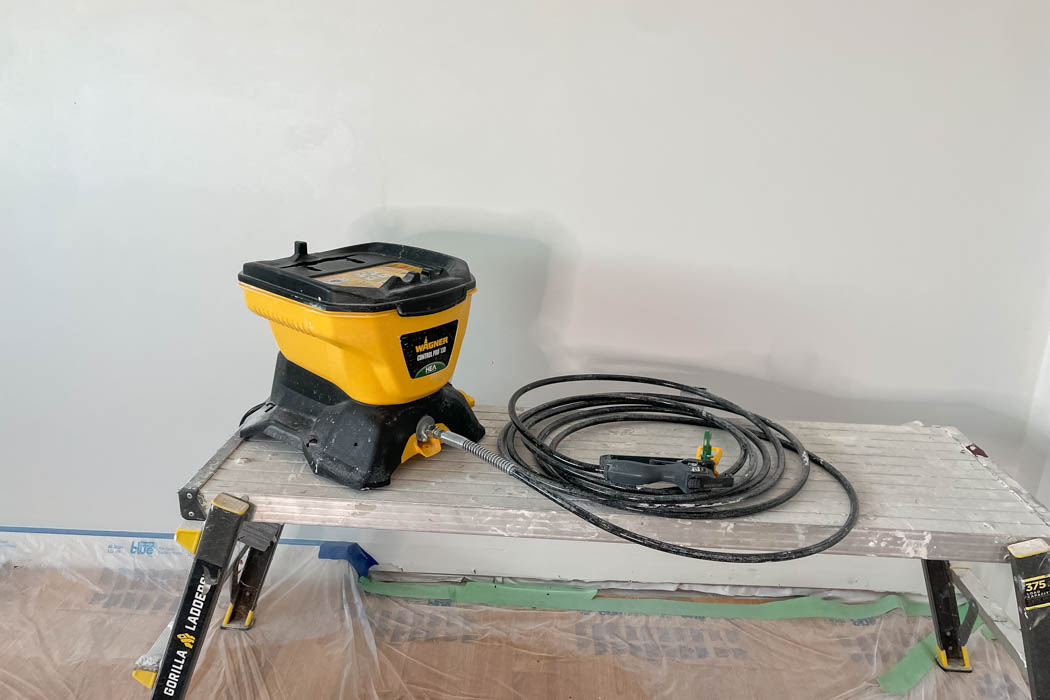
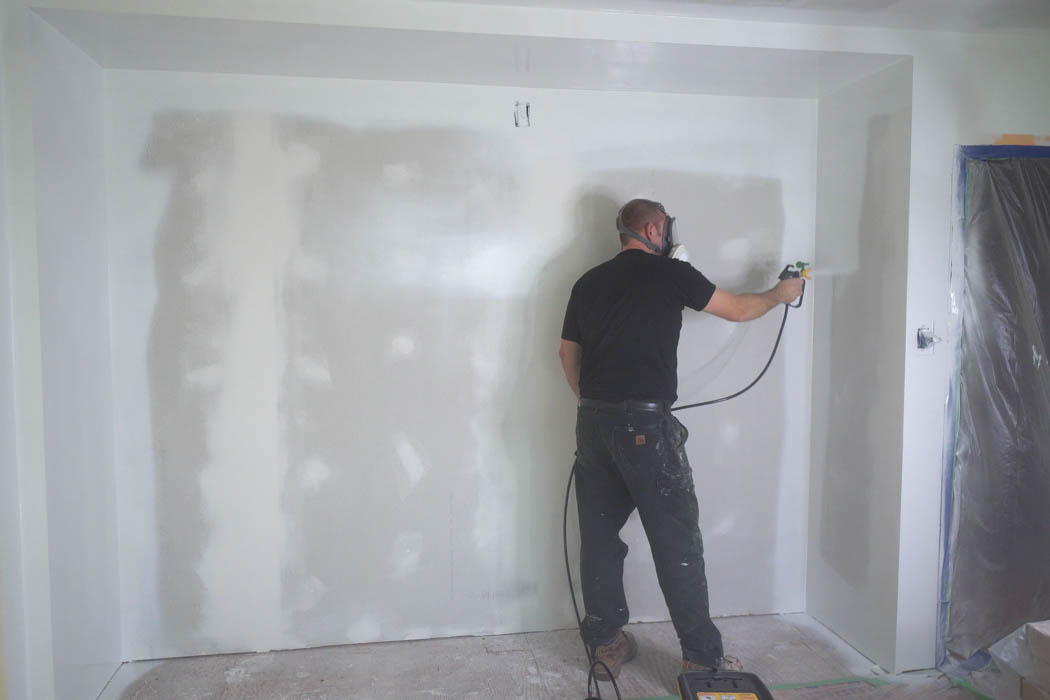
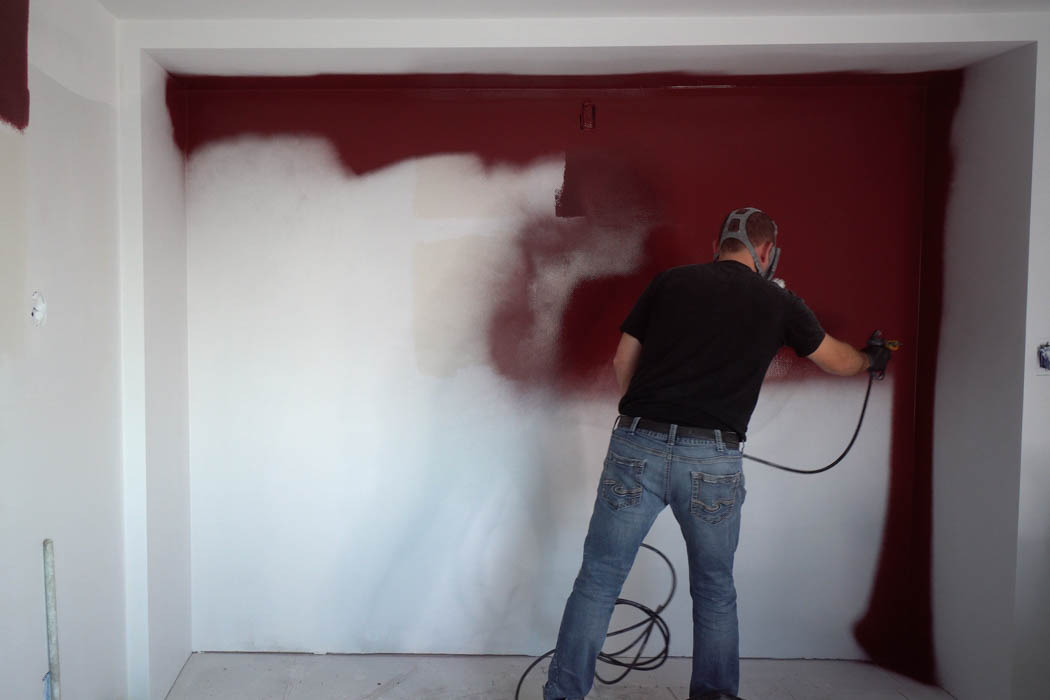
We painted the entire space, including the ceiling with our Wagner Control Pro 130. This made the painting go quick and smoothly and left a great finish. The walls were finished with with Behr’s TWINBERRY MQ1-14 in their Dynasty Matte/Flat finish.
Step 2: Design and Order you PAX system
Using the IKEA website you can draw your space and design your entire PAX wardrobe system! IKEA’s design software is a real game changer, and lets you see what your IKEA PAX system will look like when its all complete.

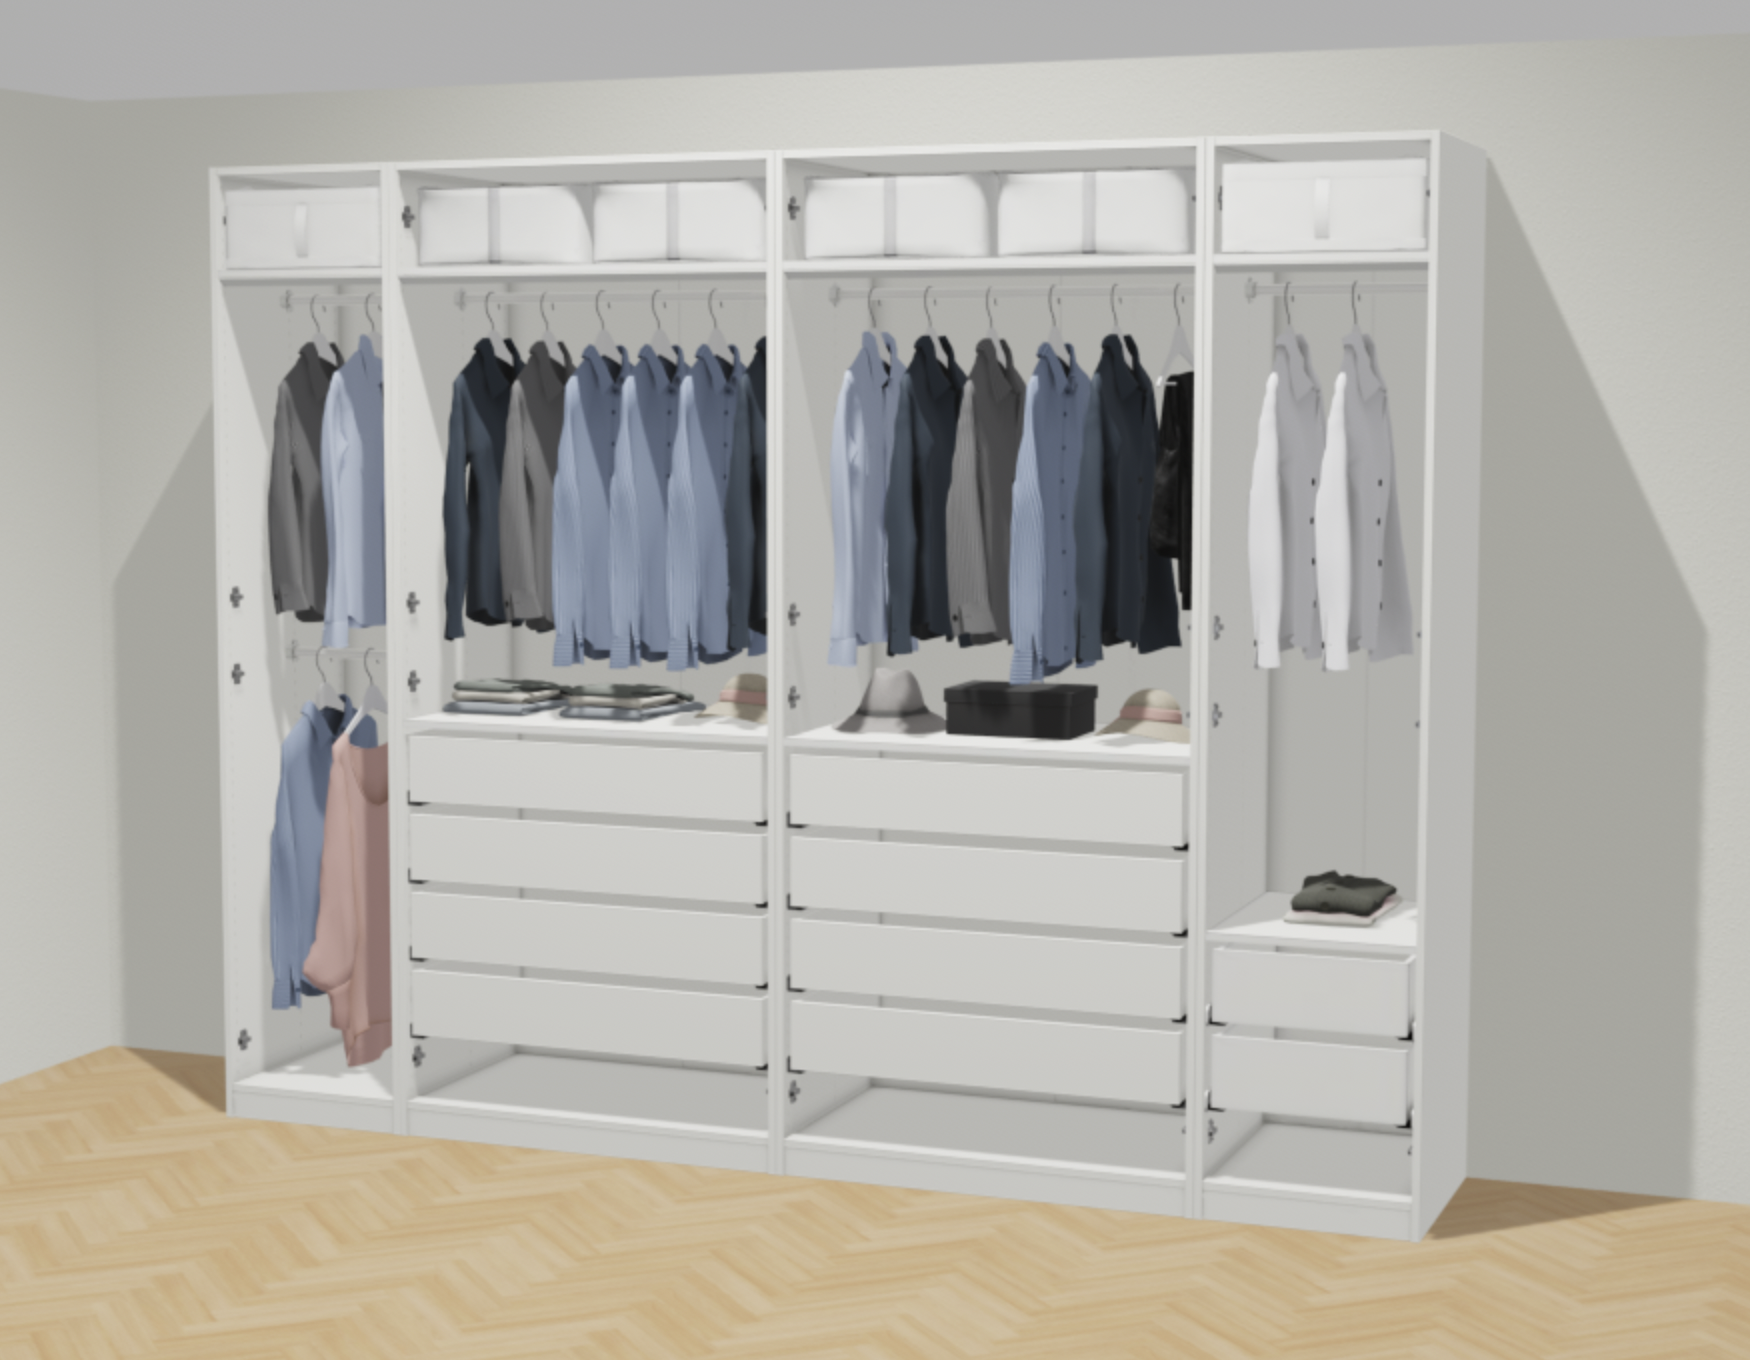
Once you are happy you can order all the components based on your design.
Step 3: Assemble the IKEA PAX Wardrobe Frames
Before you start hacking the doors, you need to assemble the PAX wardrobe units according to the IKEA instructions. These instructions are usually easy to follow and will guide you step-by-step through the process of assembling your wardrobe frames.

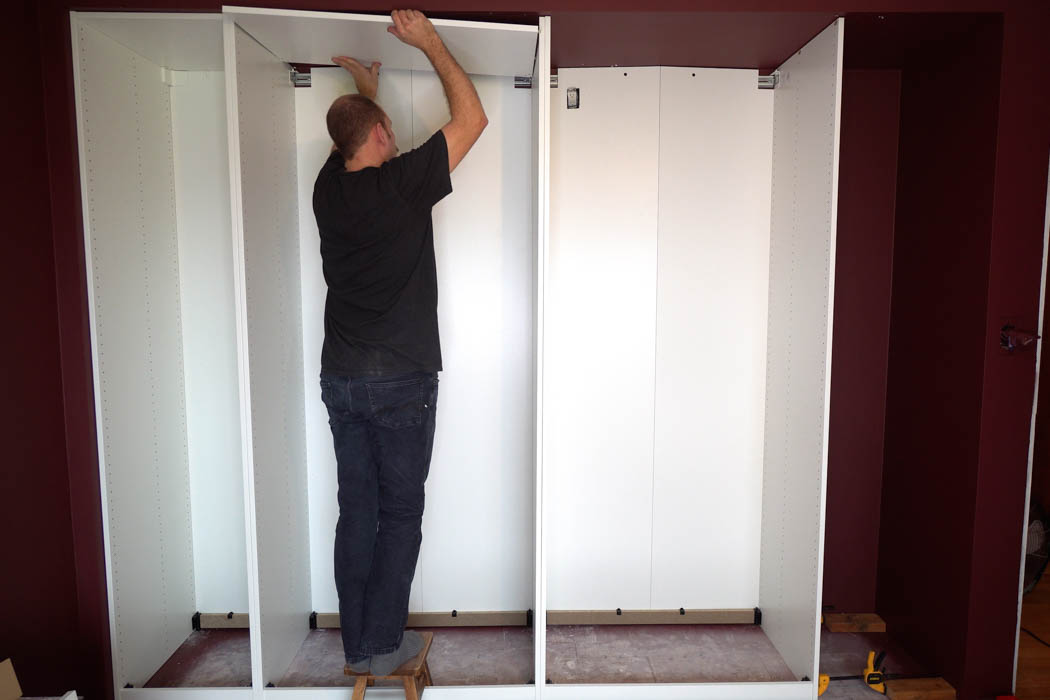
One important thing to keep in mind while assembling your pax frames is that the back of the units might have visible gaps, or there may be some unfinished edges that you’ll want to cover up for a more polished look. Adding trim or a backer piece can help disguise these areas and create a seamless, built-in appearance.
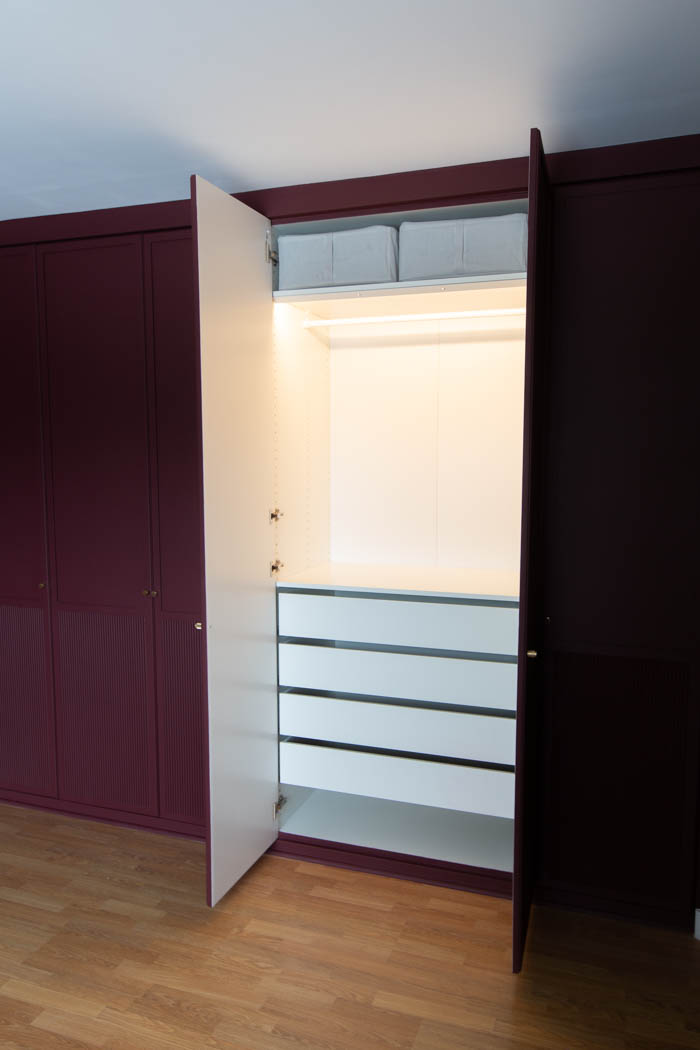
Or if you want to go the extra mile, you can recess the cabinets and drywall around them to give them a full built-in and custom look. This is the option we opted to go with.
Once your frames are assembled and securely placed in the designated area, you can begin working on the wardrobe doors.
Step 4: Adding Trim and Molding for a Built-In Look
The key to achieving a built-in closet look is adding trim pieces and/or crown molding. These design elements help elevate the wardrobe’s aesthetic and make it appear like it was custom-made for your space. You’ll want to start by cutting your crown molding to the total length of your wardrobe. Be sure to measure carefully, and use a laser level to ensure that the molding is perfectly straight.
Trim
You can also add additional trim pieces along the sides of the wardrobe to cover any gaps between the wardrobe frame and the wall. Tile spacers are a great way to ensure that the trim is spaced evenly and looks professional. See this our IKEA PAX Hack: How to Turn Pax Wardrobes into Built-Ins post for more details on that.
Crown Moulding
If you decide to add crown molding, once it is cut to size, attach it to the top of the wardrobe using a nail gun and wood glue. If there are any nail holes, fill them in with wood filler. Than lightly sand the surface to smooth it out. For a more rustic look, you can also opt for unfinished edges. You can also leave the molding slightly rough for a more organic feel.
Step 4: Customizing the Doors
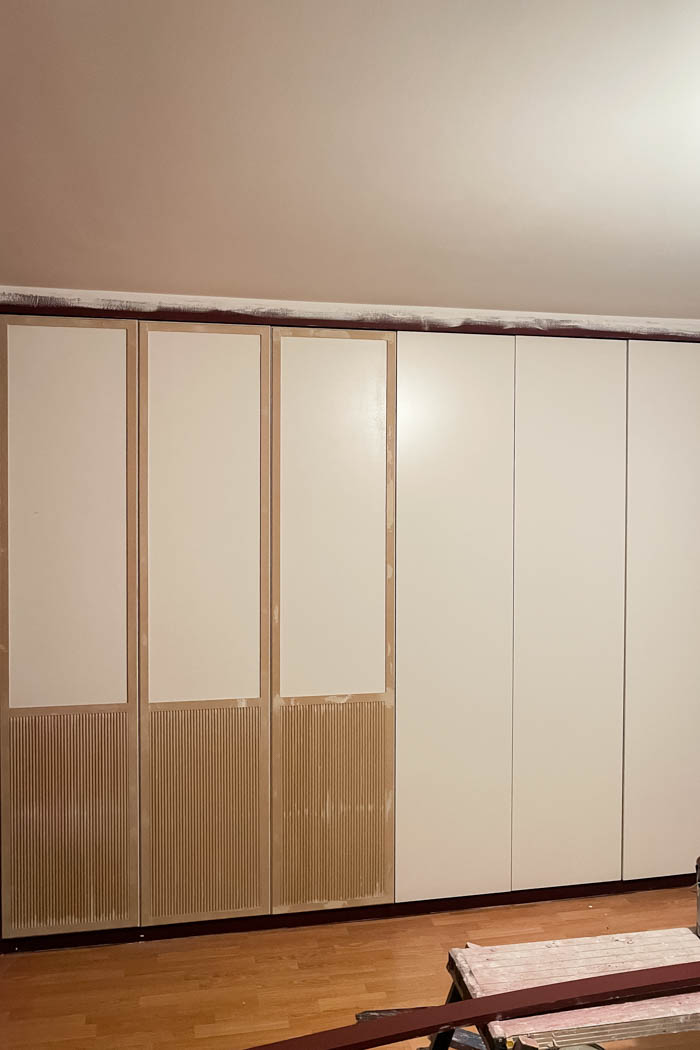
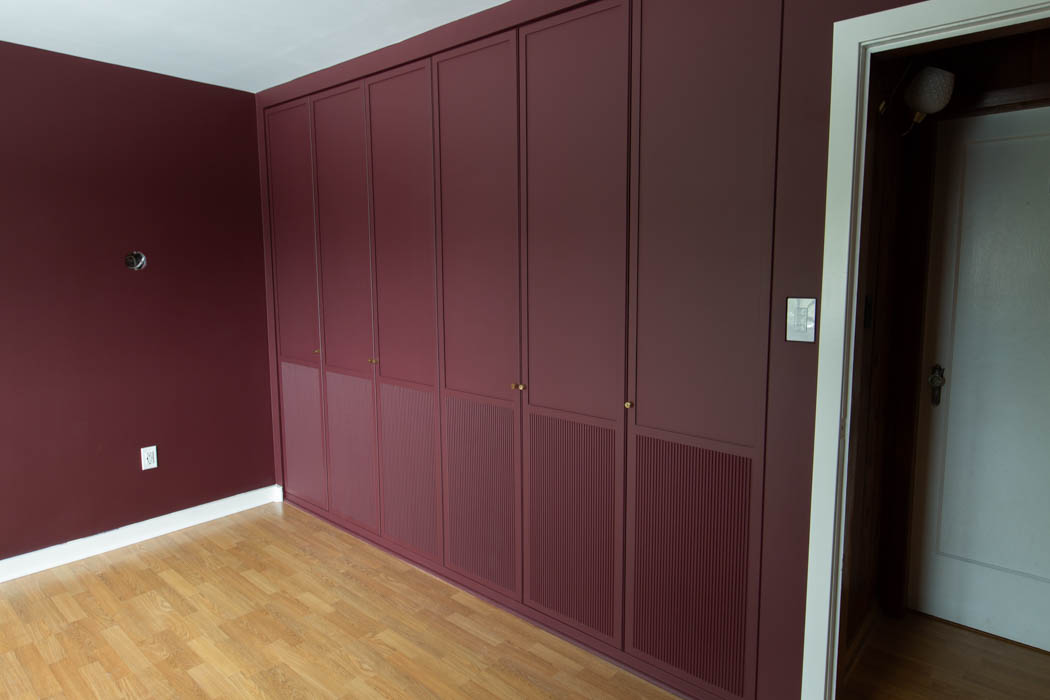
Now that the frame and trim are in place, it’s time to focus on the doors of your PAX wardrobe. The standard doors that come with the PAX wardrobe system are simple, but you can easily customize them with a few tweaks. We totally transformed IKEA’s plain door into a high end custom looking door.
Option 1: Inset Doors
If you prefer a sleek, modern design, consider creating inset doors. This style features doors that are flush with the wardrobe frame, creating a seamless, smooth surface. To achieve this, you may need to cut the door panels down to fit the frame or add trim pieces to the edges of the doors for an inset effect.
Inset doors are a great choice if you want a clean, minimalist look that’s both stylish and sophisticated. You can finish the doors with a solid color, wood stain, or even paintable wallpaper for added texture.
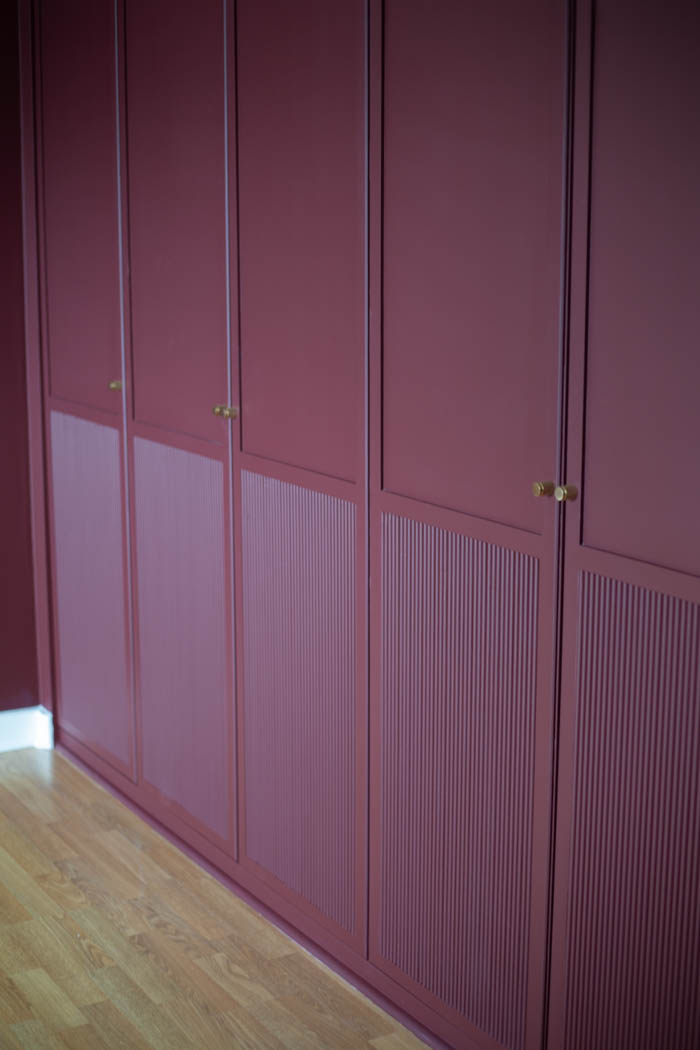
This is the option we decided to go with as we wanted to paint match the door color to the room.
Lightly Sand
Before attaching the trim be sure to ligthly sand the IKEA doors. Be careful to not sand through the doors as they are a paper face finish with a glossy coating. All you need to do is scuff the surface to allow the paint coat to stick.
Adding Trim
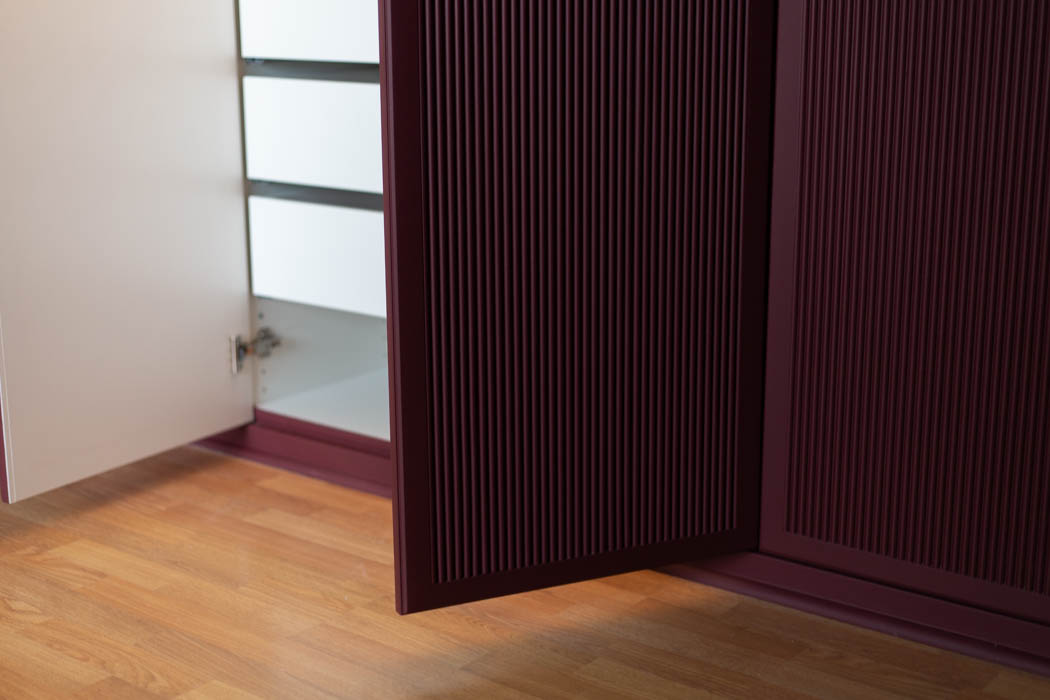
We decide to trim out the entire door perimeter with 1/4 thick” by 1-5/16″ wide trim. We added a 1/8″ chamfer to the outside edge and inset the moulding by 1/8″ to allow for the trim to clear when opening the door.


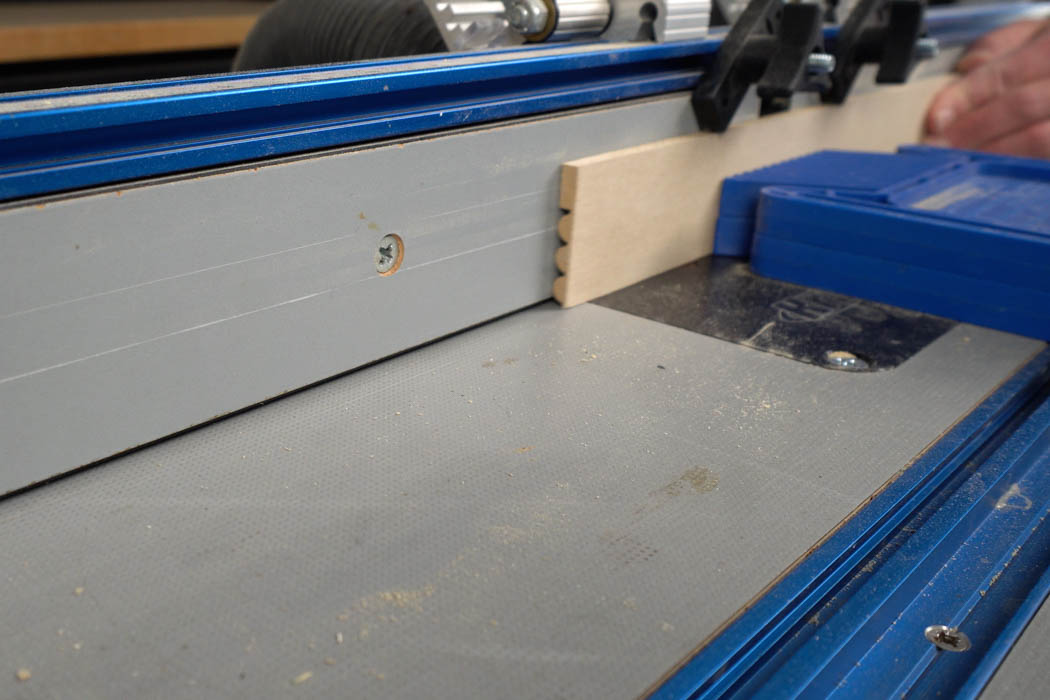
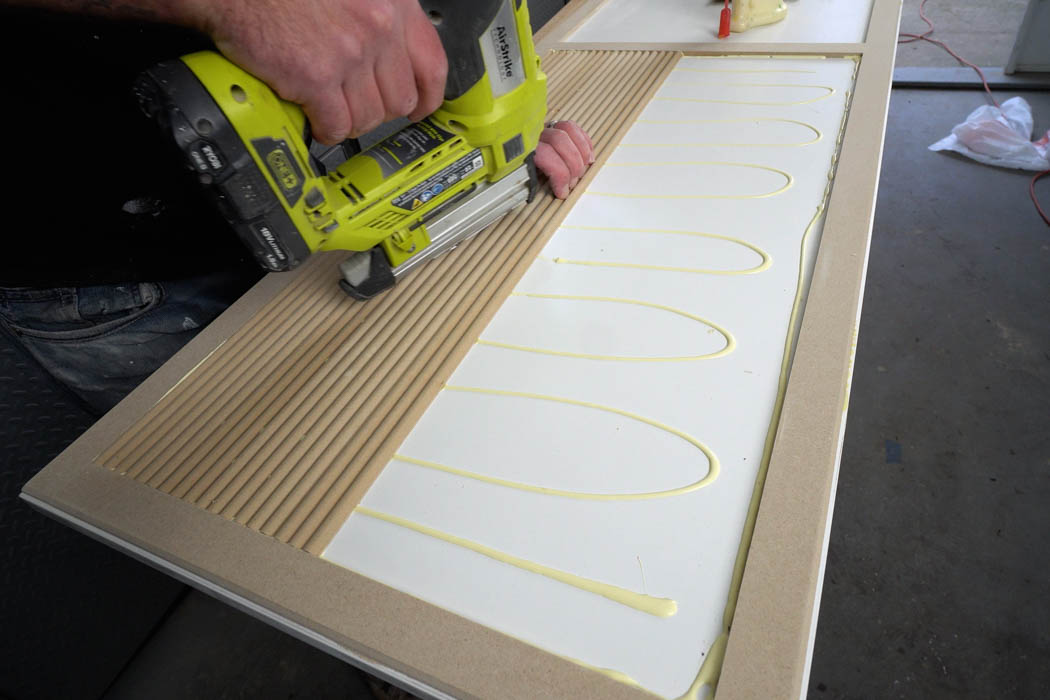
You can use a pin nailer and wood glue to attach the trim around the perimeter of the door. Make the bead fluting with a router table and a 3/16-Inch Radius Triple Bead Router Bit. Cut 1-1/2″ strips of 1/4″ MDF and than cut the triple bead using a router table.


Use a table saw to cut the trim to width. Once you have the length cut by using a miter saw, pin nail and glue to the strips to the door. You will need to fit the last edges pieces (either side) to get a nice tight fit. This can me done with a table saw. Watch our video for more details.
Paint
The next step was to paint the outside face and edges of the doors with our Wagner Flexio 3550 cordless sprayer. Applying a coat of primer first and than the top coat. To get a super smooth finish check out our Beginners Guide to Easily DIY Paint Furniture like a Pro Post and video for great tips and product suggestions.

Once the paint is dry re-install your cabinet doors.
Option 2: Mirror Inserts
Another choice for customizing your wardrobe doors is adding mirror inserts. Mirrors not only look chic but can also serve a practical purpose, particularly in a walk-in closet. If you want to add mirrors to the doors, you can either purchase pre-made mirror doors or create your own by cutting mirror panels to fit inside the doors. Use scrap pieces of wood to create a frame around the mirror, and then attach it securely with a nail gun or adhesive.
Option 3: Paintable Wallpaper or Fabric
If you’re looking for a simple but effective way to customize your wardrobe doors, consider applying paintable wallpaper. This type of wallpaper comes in various textures, from simple geometric patterns to more intricate designs. It’s easy to apply, and once it’s on the doors, you can paint it to match your color scheme.
Alternatively, you can use fabric to cover the doors. This is a particularly great option for creating a softer, more textured look. Simply staple the fabric onto the door panel, ensuring that it’s taut and secure.
Step 5: Installing Handles
To finish off the look of your custom PAX wardrobe, you’ll need to install new handles or drawer pulls. The handles are a simple but important detail that can completely change the appearance of your wardrobe.
For a modern look, consider sleek, minimalist handles, such as long, brushed metal pulls. For a more vintage or eclectic look, brass handles or colorful knobs can add a touch of personality. There are countless options available online or at your local hardware store, so you can easily find something that complements your wardrobe’s design.
When installing handles, make sure to measure and mark the placement carefully, especially if you’re adding handles to larger doors. A laser level can help you ensure that the handles are aligned evenly.
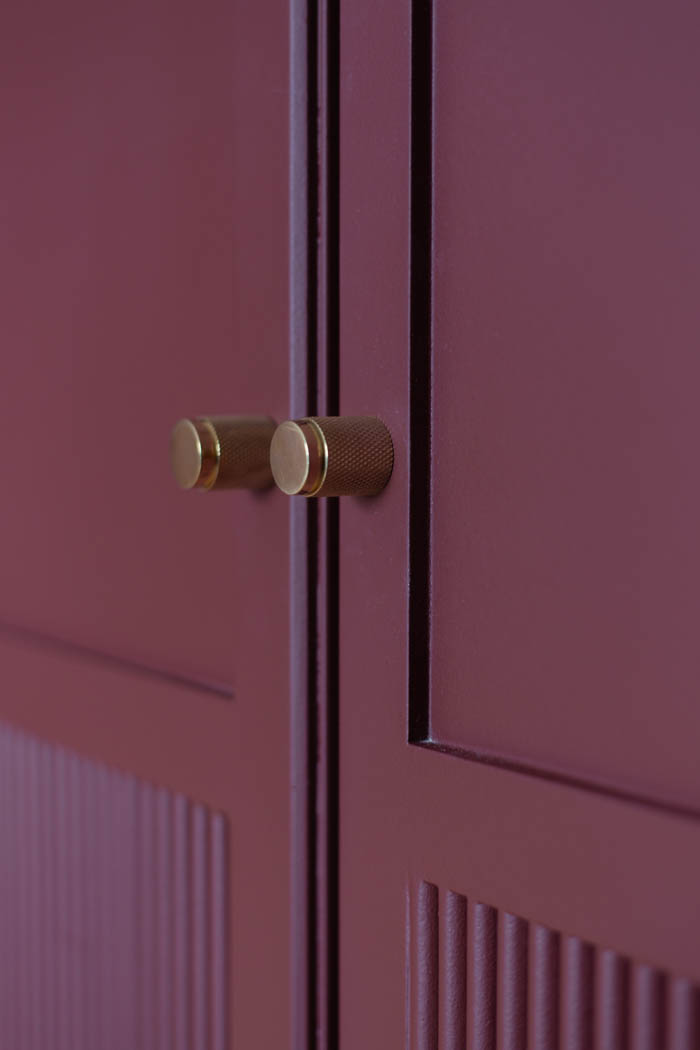
We used these sleek Nicolo Knurled Unlacquered Brass Knob from CB2. They were easy to install and looked great!
Step 6: Finishing Touches
Once your wardrobe doors are customized, it’s time to apply the finishing touches. First, sand the area on the wardrobe you plan to paint/finish lightly to ensure a smooth surface. This will also help your paint or stain adhere better. Be sure to paint any exposed edges that may peak through around the doors.
Next, apply your chosen paint. If you want a modern look, choose a neutral or bold color. For a more rustic, natural feel, consider using a wood stain that enhances the grain of the wood. If you want a clean, fresh look, go with a white or gray color that will complement any interior.
Once the paint has dried, attach any mirror doors or additional features like Komplement drawers inside the wardrobe. If you’ve added crown molding or other trim, make sure everything is securely in place, and give the entire piece a final inspection.
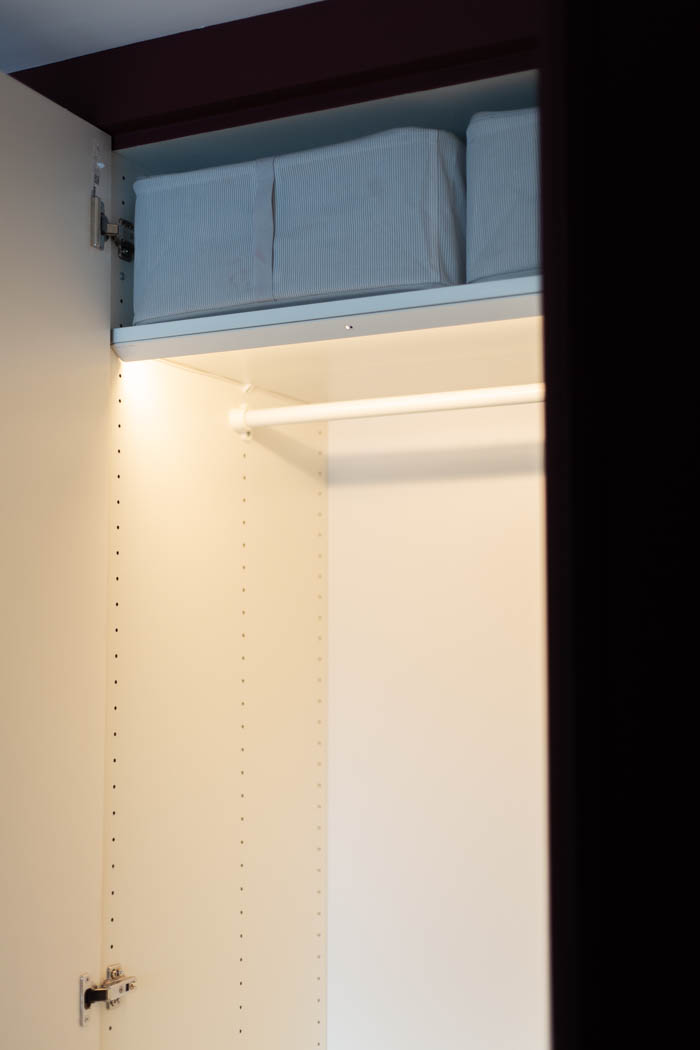
IKEA also has a great lightning system from their PAX wardrobes. Its a great idea to add another custom touch and give your cabinets a high end look. You will need to ensure you have access to a electrical plug but the installation is relatively easy. They even have sensors on them to automatically turn on/off when you open/close the doors.
Conclusion
By following these simple steps, you can completely transform your IKEA PAX wardrobe into a custom piece that looks and feels like it was made just for your space. From adding trim pieces and crown molding to creating custom doors, swapping out handles, and applying fun finishing touches, you’ll have a wardrobe that’s not only functional but also stylish and unique.

The best part about this hack is that it’s relatively easy to do, even for first-timers. With just a little bit of time, some basic tools, and a little creativity, you can create a wardrobe that looks like high-end custom cabinetry without the expensive price tag. Whether you’re designing a built-in closet, creating a walk-in wardrobe, or simply upgrading your existing PAX units, these tips and tricks will help you achieve the perfect custom look for your home.
So, what are you waiting for? Start hacking your IKEA PAX wardrobe today and enjoy the benefits of a stylish, personalized closet that works perfectly for your lifestyle.